Pages

Saturday, January 21, 2012

P is for Potpie

I am sick.  I have a cold of the worst variety.  It's the kind where I'm so congested that I can't breathe through even one nostril, my throat is itchy and sore, my skin is pale, my eyes look cloudy and tired, and all I want to do is lie down and rest.  Ironically, when I lie down, it becomes even more uncomfortable to breathe and the coughing commences.  Misery!


This is what happens since I work in a giant petri dish: an elementary school.  Granted, my immune system has become much stronger in the past few years and I've learned a few tricks of the trade.  During cold and flu season, I use Clorox wipes on the table surfaces daily and I pass around the hand sanitizer every few hours.  We use disinfecting spray around handles and doorknobs and I encourage kids to keep their hands away from their faces, but illness is inevitable.  The germs spread and the kids get sick every winter.  The empty seats are a constant reminder to me that we need to pass around the sanitizer again and discuss the elbow sneeze technique.  Covering your mouth with your hand is out.  Elbows are in.    


When you're a teacher, it's tough to be sick.  It's not that we hate to be out of the classroom for a day or two; it's that taking a day off requires several additional hours of work before you're gone and again after you come back.  So many teachers just keep on working through their illness because getting a substitute, writing lesson plans, prepping the materials, and warning all the necessary individuals takes more effort than just trucking through the school day with a tissue wad up your nose.  


I'm guilty.  While I took a sick day on Thursday to moan and groan on the couch, I attempted to return on Friday.   I whispered with my dry, crackly voice throughout the day, popped DayQuil like candy,  and kept a box of tissues nearby.  I could barely talk loud enough to get the attention of my students, and yet somehow they understood and responded appropriately.  Kids sense when you're vulnerable and sick.  They get it.  My class was uncharacteristically sensitive this week and I'm really glad I got to see the sweet, nurturing side of individual students as well as the whole group.  They were great listeners.  They noticed my gestures more than usual.  They asked fewer questions of me and instead helped each other.  They entertained themselves when they finished early instead of nagging me with "now what?!" comments.  They were more responsible with their routines and classroom jobs and made me very proud.  One tender little guy recognized how sick I felt first thing in the morning and said, "What can I do to help you?" before he even took his backpack off.  Isn't that sweet?  

While I can complain about being sick and the hassle of writing sub plans, I also have to admit that this week I appreciated my job.  I get to spend all day with young people who are learning to be empathetic and responsible.  Who am I to guide them through this journey?  Well, I'm lucky.  That's what! 

If you are on your own empathy quest, make this potpie for someone in your life who is sick right now.  It's warm and comforting, and it's a nice break from chicken noodle soup.  It's chicken potpie for the soul.


Puff Pastry Chicken Potpie
adapted from Williams-Sonoma Bride & Groom Cookbook

2 Tbsp. olive oil
4 shallots, diced
1 c. peeled, diced carrots
1 c. diced celery
2 c. peeled, diced russet potatoes
1 bag frozen mixed vegetables (corn, peas, carrots, green beans)
3 c. chicken stock
2 c. shredded chicken meat
1 c. pearl onions 
1 tsp. finely chopped fresh sage
1 tsp. thyme
1 tsp. celery salt
3 bay leaves
kosher salt and pepper
2 Tbsp. butter
3 Tbsp. all-purpose flour
1/3 c. heavy cream
1 sheet frozen puff pastry


Heat the olive oil in a medium saucepan over medium heat.  Add the onions, carrots, and celery.  Sauté the vegetables until slightly softened, 4-5 minutes.  Add the potatoes and frozen vegetables and sauté, stirring often for 3-4 minutes.  Add the stock and bring to a boil.  Lower the heat to medium low and add the shredded chicken and delicate pearl onions.  Bring to a gentle simmer.  Gently stir in the fresh sage, thyme, celery salt, bay leaves, and salt and pepper to taste.  Simmer for 10 minutes.  

Meanwhile, make a roux by melting 2 Tbsp. butter over low heat in a small saucepan.  Add the flour and stir constantly with a wooden spoon to mix thoroughly  Cook, stirring constantly for 3-4 minutes.  Do not allow the roux to brown.  Add the cream and stir vigorously until the mixture thickens.  Stir the roux into the chicken and vegetable mixture and simmer gently for 5 minutes.  It should thicken slightly.  Check the potatoes for doneness; they should be cooked through, but not mushy.  Taste and adjust seasoning with salt, pepper, sage, thyme, or celery salt as needed.  Remove the bay leaves from the mixture before pouring it into a 9 x 13" baking pan.  The dish can be prepared up to this point one day in advance or frozen at this stage for future use.  

Preheat the oven to 400 F.  Remove a sheet of prepared puff pasty from the freezer at least 10 minutes before using it so it will thaw.  Cover the 9 x 13" dish with the pastry just before you put it in the oven.  Make several incisions in the pastry with a paring knife to allow steam to escape.  Do not allow the pastry to sit for long at room temperature on top of the creamy chicken mixture as it will become soggy.  Place the potpie in the oven and bake until the pastry is golden brown, about 20 minutes.  Let cool for a few minutes before serving.              


Monday, January 16, 2012

E is for Enchiladas

After tackling poblano peppers in my paella, I feel more confident about broadening my pepper repertoire.  I've always loved jalapeños, but after getting some serious pepper burn on my hands (and face!) last summer while making a southwestern salad, I went through a pepper scare.  I thought jalapeños were the most accessible!  The easiest!  Now though, I understand that they're just the most popular and you can't accurately judge the hotness of any pepper until you taste it.  Those jalapeños made my hands burn for hours and no aloe gel, burn ointment, ibuprofen, or milk and oil soak eased my pain.  I was miserable!  And so I swore off peppers, other than the ever-friendly bell variety, until my hands and my heart healed.  You know what brought me back?  I ordered a black bean and corn chili relleno at Zocalo, one of my favorite restaurants downtown.  I let those brilliant chefs do the pepper chopping and handling.  My dinner was served with smoked tomato grits, pico de gallo, and cilantro-buttermilk honey.  It was seriously delicious and served as the exposure therapy that I needed.  


Now that the pepper scare of 2011 has come to an end, I've been experimenting with different varieties.  The poblanos were absolutely wonderful in my paella and so I decided to try another similar pepper: the anaheim.  I bought three anaheim peppers to include in roasted chicken and quinoa lettuce cups.  Peter thought they were delicious, but I was less enthused.  It wasn't the pepper flavors that bothered me; I would just rather eat lettuce cups in the heat of summer and they hardly seemed appropriate in January.  I should have known better.  


And so I tried again, with something warmer and cheesier.  I prepared a dish more comforting in the barren winter months: enchiladas.  I bought jalapeños with a fresh attitude and made my own ranchero sauce.  I delicately wrapped tortillas around black beans, chicken, and a mixture of cheeses.  I smothered them with the spicy sauce and baked them until hot and bubbly and then Peter and I devoured them.  


Black Bean and Chicken Enchiladas with Ranchero Sauce
adapted from Cooking Light, October 2011

  1. 2 tsp. olive oil 
  2. 1 c. chopped onion 
  3. garlic cloves, sliced 
  4. 1 jalapeño pepper, stemmed, seeded, and diced
  5. 1/4 tsp. kosher salt
  6. 2 c. chicken broth
  7. 1 tsp. dried oregano
  8. 1 small jar (8 oz.) tomato sauce 
  9. 1/2 tsp. ground cumin
  10. 2 Tbsp. fresh lime juice 
  11. 1/8 tsp. ground red pepper
  12. (15 oz.) can black beans, rinsed and drained 
  13. 2 c. (8 oz.) shredded cheese (I used white and sharp cheddar)
  14. 1 c. shredded chicken 
  15. Cooking spray 
  16. 12 (6-inch) tortillas
  17. diced cilantro
  18. light sour cream 
  1. Preheat oven to 400°.  Heat oil in a medium saucepan over high heat. Add onion; saute 1 minute. Reduce heat to medium; add garlic, jalapeños, and salt. Cook 5 minutes or until onions are golden brown, stirring occasionally. Add broth and oregano, tomato sauce, and cumin; cook 8 minutes or until thickened, stirring occasionally.  Pour onion mixture into a blender.  Remove center piece of blender lid (to allow steam to escape); secure lid on blender. Place a clean towel over opening in lid. Blend until smooth; stir in lime juice and ground red pepper.  Combine the beans, 1 cup grated cheese, and shredded chicken in a medium bowl.  Spread 1/2 cup sauce in the bottom of a 13 x 9-inch glass or ceramic baking dish coated with cooking spray. Warm tortillas according to package directions. Spoon bean and chicken mixture down the center of each tortilla; roll up. Place, seam-side down into the sauce. Pour remaining sauce over filled tortillas. Top with the remaining cheese. Bake at 400° for 15 minutes or until lightly browned. Sprinkle with cilantro and serve with sour cream and a salad.  


Sunday, January 15, 2012

P is for Paella

Ever heard that rule about eating shellfish?  Some people say that it's best to eat clams, mussels, scallops, and oysters in months spelled with the letter R.  Basically, don't eat filter feeders during the warmest summer months.  Why is it better to order a dozen blue points in January rather than in June?  What happens to clams in July?  Why can't I serve steamed mussels in August?  I'd heard this rule before and Peter and I have generally followed it when it comes to buying oysters on the half shell, but I never understood why summer was a bad time for shellfish.  Until today.

I did a bit of online research and learned that filter feeders can become toxic to humans during summer months if they are harvested from areas affected by algal blooms.  Warm coastal waters overcome with algae are sometimes called "red tide" because the water turns a reddish brown color.  Harmful toxins build up in filter feeders and can be poisonous to humans and animals if eaten.  Most shellfish you would get from a fishmonger has been tested for harmful toxins, so it should be safe to eat them year round.  However, if you like to rake for oysters on your summer vacation, watch out for local warnings and beach closures due to algal blooms.


It being January, a month with an R, I decided to add paella to my menu this week.  I was craving a culinary challenge and I wanted to try using a few new ingredients: poblanos and saffron.  I've watched many episodes of Mexican Made Easy on which Marcela Valladolid prepares dishes with poblanos, but I've never attempted a recipe with them in my kitchen.  It was time!  I received a vial of saffron threads in my stocking this year, along with white truffle oil and vanilla beans, so I have been anxious to use some of my epicurean gifts.  Thank you, Santa...er...Peter!      


I found this paella recipe easy to follow and relatively simple.  The toughest part is just waiting for the rice to cook and the clams to open up!  Peter helped me soak the clams in cool salty water so they'd expel sand or debris and that part isn't mentioned in the recipe, but I'd recommend it.  I don't have a snazzy paella pan, but I think my Analon skillet worked nicely.  Perhaps I'll ask Santa for that gift next year, but for for my next paella attempt, I'll probably try one of my cast iron dishes.  I was surprised how much moisture accumulated in the pan after I added the corn, tomatoes, and clams; I'd say the last few minutes on the stove top are crucial for evaporating much of the cooking liquid.  Be patient!  While you're waiting (and not stirring!), busy yourself by preparing crusty bread and a salad to accompany this wonderful dinner.


Paella with Poblanos, Corn, and Clams
adapted from Cooking Light magazine


  • 2 Tbsp. olive oil
  • 2 c. chopped onion
  • garlic cloves, minced
  • poblano chiles, seeded and chopped
  • 1 1/4 tsp. kosher salt, divided
  • 1/2 tsp. black pepper, divided
  • 3/4 c. uncooked short-grain brown rice 
  • 1/4 tsp. saffron threads, crushed
  • 2 c. water
  • 1/8 tsp. ground red pepper
  • 1 1/2 c. corn kernels
  • 1 c. halved cherry tomatoes 
  • 2 lbs. littleneck clams
  • chopped fresh flat-leaf parsley
  • lemon wedges

  • Preheat oven to 450°.  Heat oil in a 12-inch ovenproof skillet over medium-high heat. Add onion, garlic, poblanos, 1/2 teaspoon salt, and 1/4 teaspoon black pepper; sauté 3 minutes. Add rice and saffron. Cook 2 minutes; stir constantly. Add 2 cups water, 3/4 teaspoon salt, 1/4 teaspoon black pepper, and red pepper; bring to a boil.  Bake at 450° for 50 minutes or until rice is done. Stir in corn and tomatoes. Nestle clams into rice mixture. Bake at 450° for 12 minutes or until shells open, and discard unopened shells.  Return the pan to medium-high heat, and cook without stirring 10 minutes or until liquid evaporates and rice browns. (It should smell toasty but not burned.) Top with parsley and serve with lemon wedges if you'd like.


Wednesday, December 21, 2011

G is for Gingerbread House

I did it!  I successfully baked my own gingerbread house pieces, whipped up my own royal frosting, used an authentic piping bag (as opposed to the ziploc variety), and decorated a little Candy Land dream all by myself!  This was on my goal list and now I can put a big fat check mark next to this accomplishment.  I see no need for the store-bought kits now, although my years of using the gingerbread kit from Michaels probably prepared me for this moment.  Honestly, this kitchen craft wasn't too difficult;  it just took a lot of time.     


I had an incredible amount of candy to work with since my students decorated their own gingerbread houses on our last day of school before break.  Even if I'd sent home a bag of candy with each child, I would've still had leftovers because a kindergarten teacher donated a dozen half bags of candy to our cause as well.  Wow!  The kids worked hard to calculate gingerbread budgets and "bought" their candy from me to decorate their houses.  One student's grandmother sent in precious little gingerbread men that the kids put in their yards.  I manned a sprinkle and coconut snow station in the classroom and told the class that they could only eat a piece of candy when they heard a bell ring.  They demonstrated wonderful self control!  Granted, some of them sighed and groaned when their hands were coated with frosting and I wouldn't let them lick it off, but I probably would've responded in the same way if I were in their shoes.  I wish you could've heard the cheers each time I rang the official candy bell.  Those kids have never been so happy to pop a marshmallow or a gum drop in their mouths!  Any guesses on how many pieces of candy I let them eat before I loaded them on the bus with their candy-coated creations?  Three.  Just three.  Aren't I a grinch?!  


Thank goodness no one was there to ring a candy bell in my kitchen!  I licked a little bit of frosting off my fingers.  I ate a few sour straws.  I munched on mini candy canes.  I may have polished off the rest of the mini M&Ms...and I had a blast!    

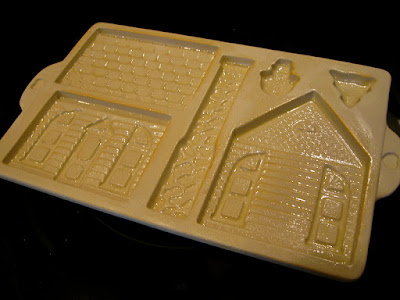
To create my confectionary abode, I used a Pampered Chef stoneware gingerbread house mold (circa 1992) from my mother-in-law.  It came with directions and recipes and a reusable piping bag with interchangeable tips.  I'll share the recipe, but understand that this dough was dry and crumbly and had to be tightly packed into the stoneware mold.  This gingerbread recipe is not for rolling out and cutting or shaping the pieces of the house.  After baking for 20 minutes, the pieces came out without a hitch and I was able to glue all the sides of the house together without any serious crumbles or cracks.                    


Gingerbread Base
from Pampered Chef

3 c. flour
1 1/2 tsp. cinnamon
1 tsp. ground ginger
1/4 tsp. ground cloves
1/4 tsp. salt
1/2 c. butter, softened
1/2 c. sugar
1/2 c. molasses
1 egg yolk

Preheat oven to 350 F.  Lightly grease mold with vegetable oil spray.  Blot out excess oil with a paper towel.  Set aside.  Combine flour, cinnamon, ginger, cloves, and salt.  Set aside.  In a large mixing bowl, beat butter and sugar at high speed until light and fluffy.  Add molasses and egg yolk and beat until smooth.  Gradually add flour mixture and continue to beat until dough is thoroughly combined.  Dough will be stiff and slightly dry.  Gather dough into a large ball.  Press half of dough firmly into greased mold.  Wrap remaining dough in plastic wrap to prevent further drying.  Level off back of dough in mold using a serrated knife.  Bake for 20 minutes or until lightly browned.  Place a cooling rack over surface of mold.  Flip mold and cooling rack together to unfold house pieces directly onto the rack.  Let mold cool completely before refilling and baking with the second half of the dough.  Lightly grease mold again before refilling.  


Royal Icing
This sticky icing acts as the mortar to hold the house together.  

3 c. powdered sugar
2 egg whites
1/2 tsp. cream of tartar

Place all ingredients in a non-plastic mixing bowl.  Beat on high speed with mixer until frosting is glossy and holds peaks, about 5 minutes.  This frosting dries very quickly, so cover the bowl with plastic wrap when not being used.  Frosting can be tinted with food color if desired.