One thing I've mastered in the past few months is cake pops. It wasn't easy and it took quite a bit of time (and a dozen or so boxes of cake mix), but I've finally reached the status of Cake Pop Master.

My first batches were a struggle for me because they would crumble and fall off the lollipop sticks or they'd drop into my bowl of dipping chocolate, leaving a delightfully chunky mess. Sometimes the chocolate coating would be gloppy and uneven or incredibly thick despite my constant reheating. I tried the double boiler approach as well as the microwave. I tried bars of chocolate, chocolate chips, and finally candy melts. Many times, after I'd successfully dipped them, my cake pops fell over or the chocolate cooled in a way that the pop looked crooked. The storage of cake pops is a little tricky, what with all the poking out lollipop sticks and the need for drying time. For just two bites of gooey cake and chocolate, what a high maintenance dessert!
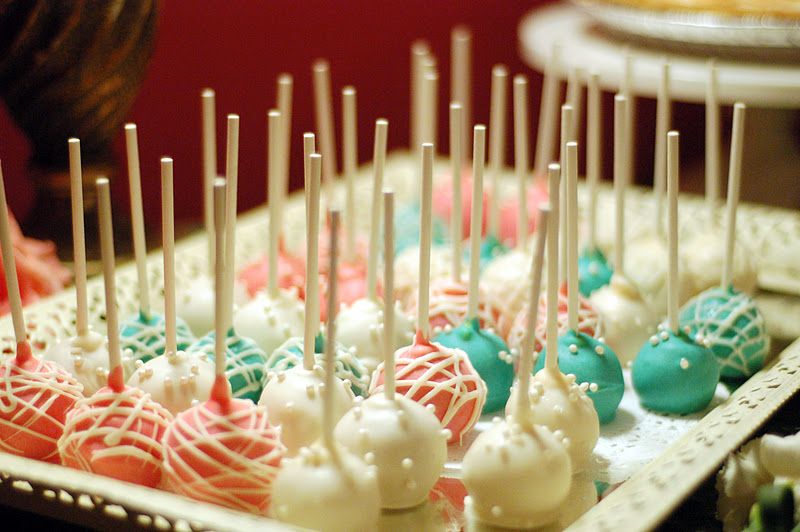
In addition to all my procedural issues, I was also dealing with color concerns. My friend Julia asked me to prepare about 100 cake pops for her dessert reception and she wanted the colors to match her adorable vintage scheme. I hoped to dye white chocolate a peachy pink color and a turquoise color, but white chocolate doesn't always accept dye and maintain color in the same way frostings do. My experience with cake frosting did not transfer to cake pop dipping! The peachy color I concocted would look wonderful in the bowl and then cool and harden as a vibrant orange or once it even developed into a lovely flesh shade. As you can imagine, they were incredibly appetizing.
Time after time, my cake pops tasted great, but they looked awful. They were my nemesis.

I've come a long way in my cake pop journey and now I can even say I've reached a state of cake pop enlightenment. It took quite a bit of googling and research to become a pro. If you're working through your own cake pop battle, I'd suggest the blog Bakerella. The author even has her own book, Cake Pops, in which she shares recipes and tips for creating some over-the-top desserts on a stick (imagine snowmen, owls, robots, and teeny tiny ice cream cones!). I'm not into characterizing my cake pops like Bakerella, but it's not difficult for me anymore to create a batch. It is and always will be a time-consuming endeavor though. Cake pops are a real treat and they're so gosh darn cute that everybody loves them. Even anti-cake people, like my husband Peter, enjoy eating cake pops. I'd say that they're worth all the trouble for events like weddings, showers, tailgates, and birthday parties.

I decided to photo document my most recent batch of cake pops so that I can share my vast and significant knowledge with you. There's no reason to keep all this wisdom to myself!
Cake Pops According to Rachel
Step 1. Bake a cake.
It's easiest to use a store-bought cake mix. Just follow the directions on the box and bake for the shortest amount of time recommended for your pan size. I prefer Pillsbury over Duncan Hines and I recommend using a glass or light-colored 13x9" pan to avoid getting dark crusty edges on your cake. Crusty edges don't crumb easily.


Step 2. Turn the cake into crumbs.
After the cake has cooled completely, you have two options. You can either break the cake up into pieces and crumb it in the food processor, or you can toss chunks of cake into your stand mixer and then pick out any large pieces that fail to break apart into crumbs. Think about your audience. If you're serving five-year-olds at a birthday party, just use the mixer to break up the cake. If you're preparing a wedding dessert, maybe you should use the food processor for a fine and consistent crumb.


Step 3. Mix the cake crumbs with frosting.
My favorite tub of frosting is Duncan Hines buttercream, but I also use Duncan Hines classic vanilla. Stick the frosting in the microwave for a few seconds before you add it to your cake crumbs. This will help it distribute more evenly. I use my stand mixer and a spatula to add a glob of icing at a time until the mixture smooths out and thickens. I almost never use the whole tub of frosting because you don't want the batter to be too thin.


Step 4. Chill the cake and frosting mixture.
Cover the bowl with plastic wrap and let it chill in the refrigerator for a few hours or up to a day.

Step 5. Roll out the cake balls.
After using a cookie dough scooper for uniform size, I hand-roll the balls of cake and place them on sheets of wax paper lining several cookie sheets. The dough is much easier to work with when it's cold, so work quickly. I can generally roll 50 to 60 1-inch cake pops from one cake mix. If you make the cake pops too large, they fall off the sticks much more easily during the dipping process.
Step 6. "Glue in" your lollipop sticks.
Put a handful of candy melts in a microwavable bowl and melt them in the microwave using 30-second intervals. Stir frequently. Dip lollipop sticks into the melted chocolate and then immediately stick them into the cake pops.

Step 7. Chill the cake pops.
Set the cookie sheets filled with cake pops in the refrigerator for a few hours or up to a day. You can also freeze the cake pops at this stage, but you must defrost them in the refrigerator before dipping them in chocolate, otherwise each pop will crack as the chocolate hardens. This is the voice of experience.
Step 8. Melt your chocolate coating.
Don't use chocolate chips because they won't melt down properly. I recommend Wilton candy melts. You can buy them at craft stores like Michael's, but most grocery stores also carry chocolate that is meant for melting down. Put half a bag of candy melts in a microwavable bowl and melt them in the microwave using 30-second intervals. Stir frequently, adding 1 teaspoon of vegetable oil (or canola oil) at a time until the mixture is very smooth and silky. It should slowly drizzle off your spoon. Add any food coloring that you need to. Make sure you use a bowl that is small enough that you'll have an inch or more of chocolate to dip into.


Step 9. Dip the cake pops.
Cold cake pops are the best for dipping because they hold together and stay on the stick. Holding the cake pop by the lollipop stick, dip it into the chocolate mixture and spin it around to coat it on all sides. Then tap the stick against the edge of the bowl while turning it so that the excess chocolate drips off and the coating becomes smooth and even. I generally take 4-8 cake pops out of the fridge at a time and then after I've dipped them, I put them on a separate cookie sheet lined with wax paper. After dipping 20-30 cake pops, you'll probably need to melt the remaining candy melts. I normally need 1 and 1/2 bags of candy melts to coat all the cake pops made by one cake mix.
Step 10. Decorate the cake pops.
The chocolate coating hardens pretty quickly, so be sure to add any sprinkles or dragees immediately after dipping. If you want to add a chocolate drizzle or some other design, spoon some of the melted chocolate into a small plastic bag and use scissors to snip the corner. While working over a plate, I like to hold the cake pop in one hand and run it under a slow stream of chocolate to create smooth, thin lines that appear to wrap around the pops.

Step 11. Admire them! Share them! Eat them!


I decided to photo document my most recent batch of cake pops so that I can share my vast and significant knowledge with you. There's no reason to keep all this wisdom to myself!
Cake Pops According to Rachel
Step 1. Bake a cake.
It's easiest to use a store-bought cake mix. Just follow the directions on the box and bake for the shortest amount of time recommended for your pan size. I prefer Pillsbury over Duncan Hines and I recommend using a glass or light-colored 13x9" pan to avoid getting dark crusty edges on your cake. Crusty edges don't crumb easily.


Step 2. Turn the cake into crumbs.
After the cake has cooled completely, you have two options. You can either break the cake up into pieces and crumb it in the food processor, or you can toss chunks of cake into your stand mixer and then pick out any large pieces that fail to break apart into crumbs. Think about your audience. If you're serving five-year-olds at a birthday party, just use the mixer to break up the cake. If you're preparing a wedding dessert, maybe you should use the food processor for a fine and consistent crumb.


Step 3. Mix the cake crumbs with frosting.
My favorite tub of frosting is Duncan Hines buttercream, but I also use Duncan Hines classic vanilla. Stick the frosting in the microwave for a few seconds before you add it to your cake crumbs. This will help it distribute more evenly. I use my stand mixer and a spatula to add a glob of icing at a time until the mixture smooths out and thickens. I almost never use the whole tub of frosting because you don't want the batter to be too thin.


Cover the bowl with plastic wrap and let it chill in the refrigerator for a few hours or up to a day.

Step 5. Roll out the cake balls.
After using a cookie dough scooper for uniform size, I hand-roll the balls of cake and place them on sheets of wax paper lining several cookie sheets. The dough is much easier to work with when it's cold, so work quickly. I can generally roll 50 to 60 1-inch cake pops from one cake mix. If you make the cake pops too large, they fall off the sticks much more easily during the dipping process.
Step 6. "Glue in" your lollipop sticks.
Put a handful of candy melts in a microwavable bowl and melt them in the microwave using 30-second intervals. Stir frequently. Dip lollipop sticks into the melted chocolate and then immediately stick them into the cake pops.

Step 7. Chill the cake pops.
Set the cookie sheets filled with cake pops in the refrigerator for a few hours or up to a day. You can also freeze the cake pops at this stage, but you must defrost them in the refrigerator before dipping them in chocolate, otherwise each pop will crack as the chocolate hardens. This is the voice of experience.
Step 8. Melt your chocolate coating.
Don't use chocolate chips because they won't melt down properly. I recommend Wilton candy melts. You can buy them at craft stores like Michael's, but most grocery stores also carry chocolate that is meant for melting down. Put half a bag of candy melts in a microwavable bowl and melt them in the microwave using 30-second intervals. Stir frequently, adding 1 teaspoon of vegetable oil (or canola oil) at a time until the mixture is very smooth and silky. It should slowly drizzle off your spoon. Add any food coloring that you need to. Make sure you use a bowl that is small enough that you'll have an inch or more of chocolate to dip into.


Step 9. Dip the cake pops.
Cold cake pops are the best for dipping because they hold together and stay on the stick. Holding the cake pop by the lollipop stick, dip it into the chocolate mixture and spin it around to coat it on all sides. Then tap the stick against the edge of the bowl while turning it so that the excess chocolate drips off and the coating becomes smooth and even. I generally take 4-8 cake pops out of the fridge at a time and then after I've dipped them, I put them on a separate cookie sheet lined with wax paper. After dipping 20-30 cake pops, you'll probably need to melt the remaining candy melts. I normally need 1 and 1/2 bags of candy melts to coat all the cake pops made by one cake mix.
Step 10. Decorate the cake pops.
The chocolate coating hardens pretty quickly, so be sure to add any sprinkles or dragees immediately after dipping. If you want to add a chocolate drizzle or some other design, spoon some of the melted chocolate into a small plastic bag and use scissors to snip the corner. While working over a plate, I like to hold the cake pop in one hand and run it under a slow stream of chocolate to create smooth, thin lines that appear to wrap around the pops.

Step 11. Admire them! Share them! Eat them!