Pages

Tuesday, April 26, 2011

K is for Kale Chips

I'm not a big fan of kale.  It's okay and I know it's healthy, but kale is just not a green I regularly pick up at the grocery store.  I used to eat it as a kid because my aunt told me it was like horse food and I loved horses.  That logic seems so silly to me now, but children will go along with just about anything, right?


Having a pound and a half in the farm box motivated me to try out a new kale recipe.  And honestly, when I say "recipe," that's a stretch.  This snack practically prepares itself.  I tore the leaves off the stalks into chip-sized pieces and put them on a cookie sheet.  Then I drizzled them with olive oil and tossed the leaves around a bit.  Finally, I sprinkled them with salt and toasted them in the oven at 375 F for 15 minutes.  I turned them halfway through with a spatula, and that was about the most difficult part of this recipe.  Done.


We had enough kale for three cookie sheets, so I did one sheet with plain salt, one with cayenne pepper, and one with garlic salt and grated parmesan cheese.  You just sprinkle on your favorite seasoning before you throw it in the oven.  My favorite was definitely the parmesan cheese version, but they were all good!  Baked kale chips don't shrink down like spinach in the way that it wilts.  They crisp up quickly and stay crisp for about 1 day.  I thought they were significantly better when a little warm and toasty, but you'll have to give it a try and see what you think!

Horses (or kids) would probably love them!        


Saturday, April 23, 2011

A is for Appetizers

I believe some desserts and dishes should be left alone in their full-fat glory.  I'm thinking about treats like homemade ice cream, creme brulĂ©e, brownies, or a meal like fried chicken or macaroni and cheese.  These splurges show up on my menus rarely and usually just for a special occasion.  In my opinion, they're so much better when made with real cream, real sugar, butter, etc. that the low-fat-diet-friendly versions just aren't worth the time and effort.  They aren't delicious.  They just make you think about how much better the "real thing" is!  

Ellie Krieger, one of my favorite Food Network stars, classifies foods as either "usually"(like most vegetables, fruits, and lean meats), "sometimes" (like breads, dairy products, grains, and starches), or "rarely" (like fried foods, baked goods, and other sweets).  I like this way of sorting and cataloging because her strategy doesn't eliminate or ban any foods; she's just helping us realize that some foods can be eaten regularly and even in great quantities, while other foods should be treated like a special event that only comes around once in a while.    

In spite of my feelings about a few sinfully decadent sweets and unhealthy treats, I also enjoy finding ways to lighten up recipes.  I try to adjust things to move a food from the "rarely" category to "sometimes."  I read America's Test Kitchen, Cooking Light magazine, Skinny Taste, and cookbooks like Cook Yourself Thin to get ideas for lightening up dishes.  I've tried quite a few Hungry Girl recipes, but none have turned out very well for me, so I'd recommend the other resources if you're interested in adding more "sometimes" and "usually" foods to your plate.  

When I'm making changes to a recipe, if I can't swap out an unhealthy ingredient for something more beneficial, I'll try using less than a recipe calls for.  This strategy usually works for a casserole, a meat course, a vegetable side, or a salad, but I'd caution against altering a baking recipe too much.  Cakes, cookies, muffins, and breads are much more sensitive to ingredient ratios, temperatures, fat content, and the texture of the ingredients.  Just make those cookies and cakes the way the recipe calls for and savor a smaller serving.


Today I want to share two incredibly simple appetizers that you can serve this spring or summer and they're sure to be a hit.  Both recipes include a "usually" food (fresh, raw veggies) and a "sometimes" food (cheese).  Enjoy these snacks without guilt!
 

Stuffed Radishes
from Linda Strup

2 bunches of radishes
2-4 Tbsp. cream cheese
1/4 c. raw shelled sunflower seeds


Clean the radishes and cut a flat surface on each end so that they will stand upright.  Use a spoon to gently top each radish with a small amount of cream cheese or neufchatel.  In a 350 oven, toast shelled sunflower seeds on a cookie sheet until fragrant and golden (about 5 minutes).  Roll the cheese-topped end of each radish in sunflower seeds so they stick.  Serve immediately for best results.


Caprese Skewers
by Rachel

Cherry tomatoes
1 hothouse cucumber
mini fresh mozzarella balls
1/4 c. olive oil
1 Tbsp. balsamic vinegar
1/2 tsp. minced garlic
1/2 tsp. kosher salt
1/2 tsp. black pepper
1 Tbsp. finely chopped fresh basil

Use a vegetable peeler to scrape stripes along the sides of the cucumber.  Cut into wedges or cubes.  Skewer cherry tomatoes, cucumber, and mozzarella in a pattern onto small skewers (I cut my long skewers in half).  Mix the olive oil, vinegar, garlic, salt, and pepper in a small bowl and drizzle over the skewers just before serving.  Sprinkle with finely chopped basil.      


Tuesday, April 19, 2011

P is for Peanut Lime Noodles

I'm feeling guilty that my last post didn't even include a recipe; it only had a link to one of my favorite blogs.  I was being lazy and sometimes we all feel that way.  The next time you're feeling lazy and don't want to venture to the grocery store for dinner ingredients, try Ellie Krieger's aromatic noodles with lime peanut sauce.  It's a vegetarian dish, but it's simple and relatively healthy and you can use any green peas, beans, or broccoli you have in the fridge.


This recipe works for me as a "pantry meal" because I usually have all that I need for it in the pantry: soy sauce, peanut butter, vinegar, ginger, peanuts, brown sugar.  If you don't have fresh ginger, use ground ginger.  I like to keep a ginger root in my freezer for a few weeks at a time and just grate off what I need and slip the root back in the freezer when I'm done.  Easy.  If you don't have scallions on hand, you could use some chives instead from an herb pot, dice a quarter of a sweet onion, or just skip it.  If you don't have a lime to squeeze, check your fridge for bottled lime juice.  In desserts and salsas, I think fresh lime juice is required; for this pasta dish, it's optional.

This meal is easy, affordable, satisfying, and it's a whole lot better for you than ordering in!   


Peanut Lime Noodles
adapted from Ellie Krieger

1/2 lb. whole wheat spaghetti
2 c. stir fry greens, like broccoli, snow peas, sugar snap peas, or even green beans
1/2 c. creamy peanut butter
1/4 c. low-sodium soy sauce
1/4 c. water
2 Tbsp. rice vinegar
2 Tbsp. fresh lime juice
1 scallion
3/4 inch fresh ginger, finely grated (or 1/2 tsp. ground ginger)
2 Tbsp. brown sugar
1/4 tsp. red pepper flakes
1/2 c. shelled peanuts (optional garnish)

Cook the pasta in a large pot, drain, and rinse with cold water.  While  the pasta is cooking, steam your green vegetables for 3-8 minutes, depending on how crisp you prefer them and which vegetable you choose (broccoli will take longer than peas, etc.).

If you'd like to garnish your dish with crunchy peanut bits, then toast the 1/2 c. of peanuts in a dry skillet for a few minutes and set them aside to cool.

In your blender, make the sauce by pureeing the peanut butter, soy sauce, water, vinegar, lime juice, scallion, ginger, sugar, and red pepper flakes.

Toss the 1/2 lb. of pasta with about 3/4 c. of the peanut sauce and use tongs to evenly coat the noodles.  Serve the pasta immediately with the steamed vegetables on the side.  Sprinkle the dish with the roasted peanuts.  I serve the remaining sauce at the table so people can drizzle it over their vegetables.

When it's time for cleanup, put the remaining sauce on any leftover noodles before you put it away in the fridge.  These savory noodles are great cold or warmed up again in a packed lunch, but they absorb a lot of the sauce over time, so even if it seems like a lot of liquid at first, it won't seem that way the next day.  Trust me!

L is for Lemon Layer Cake

My birthday is way over.  I still need to finish my thank you cards, but the wrapping paper is gone and I have no more excuses to celebrate.  To bring my birthday-season posts to a close, I will bring you the luscious lemon layered cake from my friend Cynthia.  She came across the recipe here at smitten kitchen, where there are a lot of photos and descriptive details on how to make the cake.  I cannot lay out the steps any better than Deb at Smitten Kitchen, and I consider this blog post a nod to her incredible blog and my friend Cynthia's baking talent as well.  Not only can she make a killer cake, but she has a special knack for finding the best recipes on the internet as well.  


I requested a lemon cake, but I was wowed by this tall and decadent layered delight.  Cynthia's lemon curd was fantastic & I'll be asking her to make more so I can spread it on toast on leisurely weekend mornings.  In general, I'm not a huge fan of fruity cakes, but I would make this for a shower or a summery dinner party.  It feels light and yet satisfying.  The only negative comment I have on this dessert is that the frosting hardens and dries quickly, so it's divine the first day and goes downhill quickly from there.  This frosting can't sit around for days, so plan on icing this cake the same day that you intend to serve it and send your guests home with a slice too because this is a large cake!  
 

Cynthia and I enjoyed this cake while sipping white wine and watching a chick flick: Eat, Pray, Love.  We may or may not have had two slices each...Sounds like a splendid girls' evening, doesn't it?


Thank you, friends and family, for making my birthday season so special this year!  

Wednesday, April 13, 2011

M is for Mashed Potatoes

Today I had a three hour dentist appointment.  My mouth hurts, my jaw is sore, my gums are sensitive, and I'm feeling cranky.  In addition to these maladies, my stomach is also growling.  This seems like a night for me to revert to my favorite food: mashed potatoes.  It's comfort food at it's finest!


Mashed potatoes have been my number one favorite food for as long as I can remember.  Well, more accurately, I've claimed them since the age of eight.  I know this because when I went home to Richmond over spring break, I found my autobiography:  My Book about Me.  It's actually a Dr. Seuss book, but it's meant to be filled out by a child.  When I completed this little gem as a third grader, I wrote that I had 435 freckles and 16 windows on my house.  My favorite color was pink at the time and mashed potatoes were my favorite food.  I'm questioning the accuracy of my 1993 freckle count, but I trust in that mashed potato comment.  Some things just don't change with time, and I have two grandmothers who have fed my potato habit for years and years.  I just can't kick it.


As an adult, I've adapted my recipe many times, but it always comes back to the same basic procedure.  Sometimes I'll toss some goat cheese or cream cheese in the mix, add finely diced onion or pureed cauliflower, or I'll leave the skins on the potatoes for a chunky version.  I love to add fresh herbs and I did that today because I just planted my new strawberry pot full of gorgeous green herbs!  Isn't it adorable?  I used chives, boxwood basil, and thyme.  In the pot, I also included cilantro and oregano and planted phlox on the very top.  I'm hoping it will grow and creep gently over the sides.


Mashed Potatoes
by Rachel

6-8 Yukon gold potatoes
2-4 Tbsp. butter
1 c. milk (or 1/2 c. cream and 1/2 c. milk)
1/2 tsp. garlic salt
kosher salt
pepper to taste
handful of chopped, fresh herbs (such as parsley, basil, chives, thyme, or rosemary)

Wash and peel the potatoes.  Cut them into thick discs or quarter them for cooking.  Bring a pot of salty water to a boil and gently drop in the potatoes.  Boil for at least 20 minutes.  You'll know they are done when you slide a fork in and the potato falls right off.  Drain the water and then use a masher to smash up the warm potato pieces.  Transfer the mashed mixture to your mixer and let the butter melt into the potatoes.  While the butter is melting, put the milk in the microwave for about 90 seconds so that it is lukewarm when you add it to the potatoes.  With the mixer at a low speed, slowly incorporate the milk, stopping when the potatoes are a little more creamy that you really like.  Some of the moisture will be absorbed into the mixture over time, so by doing this, you can avoid dry and lumpy potatoes.  Add garlic salt, pepper and salt and beat on high speed for about 1 minute.  Finely chop a handful of fresh herbs and toss them into the mixing bowl until just blended.  Transfer to an oven-safe dish, cover with foil, and keep warm at 200 F until you're ready to serve the potatoes.

If no one is watching, lick the beaters.      


Monday, April 11, 2011

W is for Waffles

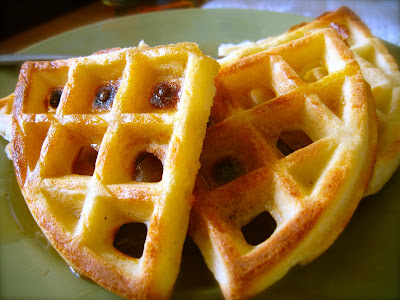
If you've ever looked for a waffle recipe that is light and airy, yet perfectly crispy on the outside, then call your search off.  Here they are.


I grew up on these waffles.  On Saturday mornings, Dad was the one running the kitchen!  He found the recipe in the 1971 Fannie Farmer Cookbook and no other waffle recipe we've tried even comes close.  If you really love dense, sugary Belgian waffles then maybe this isn't the best match for you, but I encourage you to give yeast waffles a whirl.  They are so melt-in-your-mouth delicious you'll want to eat them right out of the waffle maker...without sitting down with a plate...and gasp!  Even without syrup!  Maybe one of my favorite parts about Saturday waffles with Dad was the fact that he would tear apart the first waffle and share it with me and my brother, saying, "You have to eat the first one while the others are cooking."  Now it's hard for me not to celebrate this tradition at my own house!  


Whenever we get around to making fried chicken, waffles usually end up on our weekend menu soon after because Peter loves to top his waffles with slices of fried chicken.            

The trickiest thing about this recipe is that you need to begin the night before.  You also need a package of fresh yeast, and a thermometer so that your water and milk are the correct temperature.  If you mess around too much with the temperature of the liquids, the yeast won't be able to work its magic.  


Yeast Waffles
adapted from 1971 Fannie Farmer Cookbook

In a large mixing bowl, put 1/2 c. lukewarm water (105-115 F) and 1 package of yeast (2 1/4 tsp.).  Let this mixture stand five minutes.

Add 2 c. lukewarm milk (105-115 F), 1/2 c. melted butter or canola oil, 1 tsp. salt, and 1 tsp. sugar.  Beat this together on low speed of your mixer or you can use a whisk.  Gradually beat in 2 c. all-purpose flour.

Cover the bowl and let it stand overnight or at least 8 hours- not in the refrigerator.  While I'm mixing the ingredients together, I usually turn the oven on the lowest temperature setting for a couple minutes and let it get slightly warmer than room temperature.  Then I put the covered batter bowl in the oven to rest and rise overnight.  It should nearly double in size if you've done everything correctly!        

When you are ready to cook the waffles, add 2 large eggs and 1/4 tsp. baking soda.  Beat well.  The batter will be thin and not lumpy.  Cook the waffles in an oiled waffle iron according to your iron's directions.  They usually need to cook at my highest heat setting and I wait about 30 seconds after the steam has stopped coming out around the edges.  This recipe should make 8-10 large waffles.    

Friday, April 8, 2011

C is for Crab Cakes with Mango Cucumber Relish

The series of posts about what I ate for my birthday week and what desserts I've consumed are coming to a close, but not before I share the dish I made myself to celebrate my 26th.  I picked crab cakes long ago and have contemplated the recipe for weeks.  My friend Nicci helped me finally decide on a spicy crab cake mixture with jalapenos and bell peppers topped with a fresh salsa-like relish of mango, cilantro, and cucumber.  I served the crab cakes atop basmati rice cooked with light coconut milk instead of water.  It was divine!    


This meal was a delicious treat for my birthday, but I think this dish would be superior in the summer time, on a porch with a margarita on the rocks.  


Crab Cakes with Mango Cucumber Relish
adapted from Martha Stewart 

1/2 c. bread crumbs
2 Eggs, lightly beaten
1 lb. lump crabmeat, picked over
1/4 c. fresh cilantro, chopped
2 scallions, chopped
1/2 red bell pepper, diced
1/2 yellow bell pepper, diced
1/2 jalapeno pepper, diced
1/3 c. light mayonnaise
kosher salt to taste
black pepper freshly ground
1/2 c. vegetable oil for frying

Seed and dice all peppers. In a large bowl, gently mix together the bread crumbs, eggs, crabmeat, cilantro, scallions, peppers, mayonnaise, salt, and ground pepper.  If the mixture is too dry, add some mayonnaise.  If the mixture is too wet, add some breadcrumbs.  Use your hands to shape the
crabmeat mixture into small, thick cakes, about 1 1/2-inch inches in diameter. Heat the vegetable oil in a large skillet over medium-high heat until hot, but not smoking. Cook the  crab cakes for 3 to 4
minutes per side, until golden brown, turning  them with a spatula carefully.  Drain on a plate lined with a paper towel before serving. Serve immediately, topped with mango relish.    


Mango Relish

1 Mango, diced
1/2 jalapeno pepper
1 tsp. minced garlic 
1/2 cucumber, diced
juice of 1 lime
3 Tbsp. cilantro, chopped
1/4 tsp. osher salt
1/8 tsp. freshly-ground black pepper

Peel and dice the mango into 1/4" cubes.  Put the mango cubes in a medium mixing bowl, and
toss with the remaining ingredients.  You can refrigerate this mixture beforehand if needed, but it is not necessary.  


Thursday, April 7, 2011

S is for Sweet and Sour Meatballs

When hearing the word "meatball," most people think of towering piles of spaghetti or sloppy sandwiches smothered in marinara.  Some might picture cocktail toothpicks and saucy meatball bites at a reception.  The meatballs of my childhood weren't Italian, sandwiched, or on a toothpick.  My mom used to make sweet and sour meatballs with pineapple and green peppers and serve it over rice.  The sauce is sweet and sticky and perfectly perfect.  Once the meatballs and fruit chunks are gone, you'll want to scrape the plate free of the gooey goodness.   


This was always one of my favorite dinners at home, but it hasn't quite made the rankings for family favorites.  It's delicious and relatively simple, but this dish just doesn't come to my mind like spaghetti and meatballs, grilled chicken, or other dinner classics.  Since I just made a special trip to Richmond to visit my family, my mom blew the dust off this recipe card and whipped up some sweet and sour meatballs for my birthday dinner.  She served the dish with wild rice and a fruit salad and it was a very satisfying meal.   


I'm sure this recipe would work with ground turkey or chicken if you'd rather not use beef.  You can also make the sauce and serve it over baked chicken breasts and rice instead of making meatballs.  If I were making this dish at home, I'd use Splenda baking mix instead of 1/4 c. sugar and I'd use low sodium soy sauce.  This dish can be made ahead and frozen for later use.  


Sweet and Sour Meatballs

Meatballs

1 lb. ground beef
1/4 c. dry bread crumbs
2 Tbsp. chopped onion
1/2 tsp. salt
1/8 tsp. pepper
1 Tbsp. oil (vegetable or canola)

Make the meatballs by mixing the ingredients in a large bowl and rolling 1" balls.  Brown in 1 Tbsp. vegetable or canola oil.  Remove from pan and pour out the drippings.  

Sauce

1/4 c. sugar
2 Tbsp. cornstarch
2 Tbsp. soy sauce
2 Tbsp. vinegar
1/2 c. water
1/2 c. reserved pineapple juice/syrup
1-2 green peppers, sliced
1 1/4 c. drained pineapple chunks

Combine sugar and cornstarch in frying pan.  Stir in soy sauce, water, vinegar, and syrup.  Cook on medium-high heat, stirring constantly until the mixture thickens and boils.  Add green pepper, pineapple, and meatballs.  Lower the temperature to medium-low.  Cover and simmer for 15-20 minutes.