Pages

Monday, December 19, 2011

B is for Butternut Squash Soup

I've had plenty of mediocre butternut squash soups.  They often need salt or lack some type of seasoning and typically they're too watery.  Why do so many chefs add apples and baking spices to butternut soup?  It's not dessert!  In my opinion, it should be more savory and less sweet.  I've ordered squash soup at restaurants before feeling confident that I'm making a smart, healthy choice, but after a few spoonfuls I feel disappointed.  Anyone else felt this way before?  In my mind, butternut squash soup might as well be called "jealousy soup," because I'm usually envious of the appetizers other people ordered.        


Many butternut squash soups disappoint, but this is an absolutely fantastic recipe.  I've made it a dozen times and for some reason, we don't tire of it quickly.  Peter and I like to have a small bowl as a first course to our meal and sometimes we pack it in our lunch bags with half a sandwich.  The flavors from roasting the squash and caramelizing the onions make it very special and give it the savory quality that I crave in a soup.  The blend of herbs--parsley, sage, rosemary, and thyme--is absolutely perfect.  Fresh herbs are essential!  If you want to cut back though, at least use fresh rosemary and thyme.  When I prepare this soup, I use homemade chicken stock, but I'm sure the canned version would be just fine as long as you get the low-sodium version to control the saltiness.  If you want to make this vegetarian friendly, substitute vegetable stock for the chicken stock.  Now, as a disclaimer: this recipe is not low-fat.  There will be heavy cream involved.  However, this soup is so rich, flavorful, and creamy, a relatively small serving is satisfying.  Expect to see empty bowls!  


Butternut Squash Soup
adapted from Tim Douglas' Seattle Kitchen

3-4 lb. butternut squash
olive oil for brushing squash
1 Tbsp. butter
2 Tbsp. olive oil
4 c. thinly sliced onions (about 2 onions)
3 c. chicken stock (or vegetable stock)
1/2-3/4 c. heavy cream
1 1/2 tsp. chopped fresh flat-leaf parsley
1/2 tsp. chopped fresh sage
1/2 tsp. chopped fresh rosemary
1/2 tsp. chopped fresh thyme
1 tsp. sherry vinegar or apple cider vinegar
kosher salt and freshly ground black pepper
creme fraiche and thyme sprigs for garnish

Preheat the oven to 400 F.  Cut the squash in half and scoop out the seeds.  Brush the cut edges with olive oil and place on a baking sheet, cut side down.  Roast the squash until very soft, about 80 minutes.  Remove from the oven.  When cool enough to handle, scoop the squash out of the skin and set aside.

While the squash is roasting, caramelize the onions.  Heat the butter with the olive oil in a sauté pan over medium heat.  Add the onions and cook slowly, stirring occasionally until they are soft and golden brown, 20-30 minutes.  Do not let them burn or become crispy.  Set aside.

In a food processor fitted with a standard chopping blade, process the squash, onions, and 1 cup of chicken stock until smooth.  This may need to be done in two batches, depending on your food processor.  Pour the puree into a large pot.  Add the remaining 2 cups of chicken stock and heat the soup to a simmer, stirring occasionally.  Add the heavy cream, chopped herbs, and vinegar.  Season to taste with salt and pepper.

To serve, ladle the hot soup into bowls and serve with a swirl of creme fraiche and a thyme sprig.  This soup can be made a few days before you plan to serve it; just store it in the refrigerator and reheat before serving.     


Saturday, December 17, 2011

S is for Sausage Cheese Grits

Today I want to share one of my all-time favorite breakfasts: sausage cheese grits.  It is absolutely perfect for brunch or a family breakfast with lots of people around the table.  Expecting company?  Do you want to try something other than French toast and breakfast casserole?  If you prepare this dish, I promise you'll win over the hearts those stubborn northerners who claim not to like corn grits!


Growing up, my mom used to present this steaming dish on Saturday mornings and we would wrap up the leftovers to enjoy all week.  It will be creamy and smooth the day that you first prepare it, but after some time in the refrigerator, it will become more like a firm cake that can be cut into squares and reheated for a minute in the microwave.  Don't expect too many leftovers though.  Everyone at your table will be asking for seconds!  


Peter likes to make this dish when we have a house full of company.  Trust me when I say it's just as popular around the holidays as it is in the heat of summertime at the lake house.  Oftentimes, we put this dish together at night before we head to bed so that we can just pop it in the oven in the morning.  It does require nearly an hour of cooking and resting time before you can serve it, so I'll admit I sometimes set an alarm to get up to put it in the oven and then I go back to bed for a while.  I usually serve this dish along with toast and a mixed fruit salad.  Enjoy!

Sausage Cheese Grits
from Judy Diehl

1 lb. pork sausage, browned and drained
4 c. water
1 tsp. salt
1 c. grits (not instant)
4 eggs, lightly beaten
1 1/2 c. (6 oz) sharp cheddar, shredded and divided
1/2 c. milk
1/4 c. butter, softened
salt and pepper to taste

Brown and drain the pork sausage.  Set aside.  In a saucepan, bring water and salt to a boil.  Slowly stir in the grits and reduce the heat.  Cook 4 minutes.  Remove from the heat and add a small amount of hot grits to eggs while stirring.  Return the grits, now mixed with eggs, to the saucepan.  Add the butter and stir until it melts.  Stir in browned sausage, 1 c. shredded cheese, and milk.  Stir until well mixed.  Pour into a greased 13x9" baking dish.  Sprinkle with the remaining cheese, salt, and pepper.  Bake at 350 F for 50-55 minutes.  Once you remove it from the oven, let it rest for about 10 minutes before serving.  

Variations:
This grits casserole is also fantastic with pepper jack cheese, spicy sausage, and a can of drained Rotel tomatoes with green chilies if you're looking for a Mexican flair to your breakfast.  

If you have swiss cheese and leftover spiral ham, substitute these ingredients for the cheddar and sausage. 


Sunday, November 13, 2011

C is for Cake Pops

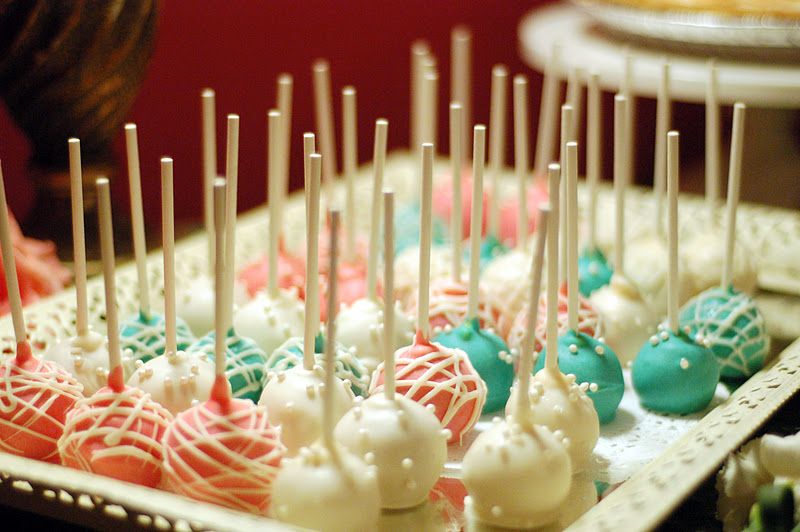
One thing I've mastered in the past few months is cake pops.  It wasn't easy and it took quite a bit of time (and a dozen or so boxes of cake mix), but I've finally reached the status of Cake Pop Master.
   

My first batches were a struggle for me because they would crumble and fall off the lollipop sticks or they'd drop into my bowl of dipping chocolate, leaving a delightfully chunky mess.  Sometimes the chocolate coating would be gloppy and uneven or incredibly thick despite my constant reheating.  I tried the double boiler approach as well as the microwave.  I tried bars of chocolate, chocolate chips, and finally candy melts. Many times, after I'd successfully dipped them, my cake pops fell over or the chocolate cooled in a way that the pop looked crooked.  The storage of cake pops is a little tricky, what with all the poking out lollipop sticks and the need for drying time.  For just two bites of gooey cake and chocolate, what a high maintenance dessert!  


In addition to all my procedural issues, I was also dealing with color concerns.  My friend Julia asked me to prepare about 100 cake pops for her dessert reception and she wanted the colors to match her adorable vintage scheme.  I hoped to dye white chocolate a peachy pink color and a turquoise color, but white chocolate doesn't always accept dye and maintain color in the same way frostings do.  My experience with cake frosting did not transfer to cake pop dipping!  The peachy color I concocted would look wonderful in the bowl and then cool and harden as a vibrant orange or once it even developed into a lovely flesh shade.  As you can imagine, they were incredibly appetizing.  

Time after time, my cake pops tasted great, but they looked awful.  They were my nemesis.   


I've come a long way in my cake pop journey and now I can even say I've reached a state of cake pop enlightenment.  It took quite a bit of googling and research to become a pro.  If you're working through your own cake pop battle, I'd suggest the blog Bakerella.  The author even has her own book, Cake Pops, in which she shares recipes and tips for creating some over-the-top desserts on a stick (imagine snowmen, owls, robots, and teeny tiny ice cream cones!).  I'm not into characterizing my cake pops like Bakerella, but it's not difficult for me anymore to create a batch.  It is and always will be a time-consuming endeavor though.  Cake pops are a real treat and they're so gosh darn cute that everybody loves them.  Even anti-cake people, like my husband Peter, enjoy eating cake pops.  I'd say that they're worth all the trouble for events like weddings, showers, tailgates, and birthday parties.


I decided to photo document my most recent batch of cake pops so that I can share my vast and significant knowledge with you.  There's no reason to keep all this wisdom to myself!


Cake Pops According to Rachel

Step 1.  Bake a cake.
It's easiest to use a store-bought cake mix.  Just follow the directions on the box and bake for the shortest amount of time recommended for your pan size.  I prefer Pillsbury over Duncan Hines and I recommend using a glass or light-colored 13x9" pan to avoid getting dark crusty edges on your cake.  Crusty edges don't crumb easily.


Step 2.  Turn the cake into crumbs.
After the cake has cooled completely, you have two options.  You can either break the cake up into pieces and crumb it in the food processor, or you can toss chunks of cake into your stand mixer and then pick out any large pieces that fail to break apart into crumbs.  Think about your audience.  If you're serving five-year-olds at a birthday party, just use the mixer to break up the cake.  If you're preparing a wedding dessert, maybe you should use the food processor for a fine and consistent crumb.


Step 3.  Mix the cake crumbs with frosting.
My favorite tub of frosting is Duncan Hines buttercream, but I also use Duncan Hines classic vanilla.  Stick the frosting in the microwave for a few seconds before you add it to your cake crumbs.  This will help it distribute more evenly.  I use my stand mixer and a spatula to add a glob of icing at a time until the mixture smooths out and thickens.  I almost never use the whole tub of frosting because you don't want the batter to be too thin.


Step 4.  Chill the cake and frosting mixture.
Cover the bowl with plastic wrap and let it chill in the refrigerator for a few hours or up to a day.


Step 5.  Roll out the cake balls.
After using a cookie dough scooper for uniform size, I hand-roll the balls of cake and place them on sheets of wax paper lining several cookie sheets.  The dough is much easier to work with when it's cold, so work quickly.  I can generally roll 50 to 60 1-inch cake pops from one cake mix.  If you make the cake pops too large, they fall off the sticks much more easily during the dipping process.  

Step 6.  "Glue in" your lollipop sticks.
Put a handful of candy melts in a microwavable bowl and melt them in the microwave using 30-second intervals.  Stir frequently.  Dip lollipop sticks into the melted chocolate and then immediately stick them into the cake pops.

Step 7.  Chill the cake pops.
Set the cookie sheets filled with cake pops in the refrigerator for a few hours or up to a day.  You can also freeze the cake pops at this stage, but you must defrost them in the refrigerator before dipping them in chocolate, otherwise each pop will crack as the chocolate hardens.  This is the voice of experience.

Step 8.  Melt your chocolate coating.
Don't use chocolate chips because they won't melt down properly.  I recommend Wilton candy melts.  You can buy them at craft stores like Michael's, but most grocery stores also carry chocolate that is meant for melting down.  Put half a bag of candy melts in a microwavable bowl and melt them in the microwave using 30-second intervals.  Stir frequently, adding 1 teaspoon of vegetable oil (or canola oil) at a time until the mixture is very smooth and silky.  It should slowly drizzle off your spoon.  Add any food coloring that you need to.  Make sure you use a bowl that is small enough that you'll have an inch or more of chocolate to dip into.


Step 9.  Dip the cake pops.
Cold cake pops are the best for dipping because they hold together and stay on the stick.  Holding the cake pop by the lollipop stick, dip it into the chocolate mixture and spin it around to coat it on all sides.  Then tap the stick against the edge of the bowl while turning it so that the excess chocolate drips off and the coating becomes smooth and even.  I generally take 4-8 cake pops out of the fridge at a time and then after I've dipped them, I put them on a separate cookie sheet lined with wax paper.  After dipping 20-30 cake pops, you'll probably need to melt the remaining candy melts.  I normally need 1 and 1/2 bags of candy melts to coat all the cake pops made by one cake mix.      


Step 10.  Decorate the cake pops.                        
The chocolate coating hardens pretty quickly, so be sure to add any sprinkles or dragees immediately after dipping.  If you want to add a chocolate drizzle or some other design, spoon some of the melted chocolate into a small plastic bag and use scissors to snip the corner.  While working over a plate, I like to hold the cake pop in one hand and run it under a slow stream of chocolate to create smooth, thin lines that appear to wrap around the pops.


Step 11.  Admire them!  Share them!  Eat them!


Friday, November 11, 2011

R is for Resilient

I've been away.  And by that, I don't mean that I've been traveling.  Wouldn't that be exciting?  Nope.  I mean that I've allowed myself to become fully consumed by my work as a teacher and my responsibilities as a student at UVA (again).  What started back in September as a feeling of regular busyness has spiraled out of control.  I haven't been paying enough attention to myself nor have I saved time for my most favorite hobby.

For those readers and friends who've always wondered if Peter and I "really do eat like that," the answer is yes.  Or, well, we used to.  I used to cook at least three nights per week and spend hours in the kitchen on weekends when I tackled larger projects such as making pasta or painting sugar cookies.  I loved it.

I still cook to put dinner on the table, but things have felt different over the past few months.  We've eaten some nice meals and I've prepared some old favorites, but I feel like my creativity and energy have been "used up" at school before I ever make it home.  I haven't been keeping my camera in the kitchen and sometimes I avoid my laptop for a few days at a time.  I haven't been reading my favorite blogs or sticking post-it notes all over my cookbooks!  My kitchen hasn't served as my place of solitude.  Frankly, no place has.

For lack of better words, I'm in a funk.

I know that things will improve gradually.  Maybe working conditions will become less stressful as the year continues or perhaps I'll just become more capable of handling the burden, but I know I'm on the way back up.  I am resilient and strong.  Hardy and irrepressible!  And I vow to make time for myself and my own interests this winter.  I'm going to can jams and conserves.  I want to make a sourdough starter and create loaves of sourdough bread.  I'll bake pieces of gingerbread to build a house and whip up my own royal frosting.  I'm going to make pumpkin granola and jalapeño stuffing, peppermint bark and carrot soup.  I will!  Not because it's on my to-do list or because anyone is expecting me to, but because I want to and because I love it.

"Doing what you love is the cornerstone of having abundance in your life."  - Wayne Dyer