Pages

Wednesday, December 21, 2011

G is for Gingerbread House

I did it!  I successfully baked my own gingerbread house pieces, whipped up my own royal frosting, used an authentic piping bag (as opposed to the ziploc variety), and decorated a little Candy Land dream all by myself!  This was on my goal list and now I can put a big fat check mark next to this accomplishment.  I see no need for the store-bought kits now, although my years of using the gingerbread kit from Michaels probably prepared me for this moment.  Honestly, this kitchen craft wasn't too difficult;  it just took a lot of time.     


I had an incredible amount of candy to work with since my students decorated their own gingerbread houses on our last day of school before break.  Even if I'd sent home a bag of candy with each child, I would've still had leftovers because a kindergarten teacher donated a dozen half bags of candy to our cause as well.  Wow!  The kids worked hard to calculate gingerbread budgets and "bought" their candy from me to decorate their houses.  One student's grandmother sent in precious little gingerbread men that the kids put in their yards.  I manned a sprinkle and coconut snow station in the classroom and told the class that they could only eat a piece of candy when they heard a bell ring.  They demonstrated wonderful self control!  Granted, some of them sighed and groaned when their hands were coated with frosting and I wouldn't let them lick it off, but I probably would've responded in the same way if I were in their shoes.  I wish you could've heard the cheers each time I rang the official candy bell.  Those kids have never been so happy to pop a marshmallow or a gum drop in their mouths!  Any guesses on how many pieces of candy I let them eat before I loaded them on the bus with their candy-coated creations?  Three.  Just three.  Aren't I a grinch?!  


Thank goodness no one was there to ring a candy bell in my kitchen!  I licked a little bit of frosting off my fingers.  I ate a few sour straws.  I munched on mini candy canes.  I may have polished off the rest of the mini M&Ms...and I had a blast!    

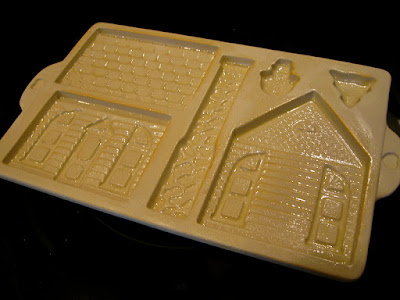
To create my confectionary abode, I used a Pampered Chef stoneware gingerbread house mold (circa 1992) from my mother-in-law.  It came with directions and recipes and a reusable piping bag with interchangeable tips.  I'll share the recipe, but understand that this dough was dry and crumbly and had to be tightly packed into the stoneware mold.  This gingerbread recipe is not for rolling out and cutting or shaping the pieces of the house.  After baking for 20 minutes, the pieces came out without a hitch and I was able to glue all the sides of the house together without any serious crumbles or cracks.                    


Gingerbread Base
from Pampered Chef

3 c. flour
1 1/2 tsp. cinnamon
1 tsp. ground ginger
1/4 tsp. ground cloves
1/4 tsp. salt
1/2 c. butter, softened
1/2 c. sugar
1/2 c. molasses
1 egg yolk

Preheat oven to 350 F.  Lightly grease mold with vegetable oil spray.  Blot out excess oil with a paper towel.  Set aside.  Combine flour, cinnamon, ginger, cloves, and salt.  Set aside.  In a large mixing bowl, beat butter and sugar at high speed until light and fluffy.  Add molasses and egg yolk and beat until smooth.  Gradually add flour mixture and continue to beat until dough is thoroughly combined.  Dough will be stiff and slightly dry.  Gather dough into a large ball.  Press half of dough firmly into greased mold.  Wrap remaining dough in plastic wrap to prevent further drying.  Level off back of dough in mold using a serrated knife.  Bake for 20 minutes or until lightly browned.  Place a cooling rack over surface of mold.  Flip mold and cooling rack together to unfold house pieces directly onto the rack.  Let mold cool completely before refilling and baking with the second half of the dough.  Lightly grease mold again before refilling.  


Royal Icing
This sticky icing acts as the mortar to hold the house together.  

3 c. powdered sugar
2 egg whites
1/2 tsp. cream of tartar

Place all ingredients in a non-plastic mixing bowl.  Beat on high speed with mixer until frosting is glossy and holds peaks, about 5 minutes.  This frosting dries very quickly, so cover the bowl with plastic wrap when not being used.  Frosting can be tinted with food color if desired.      


Monday, December 19, 2011

B is for Butternut Squash Soup

I've had plenty of mediocre butternut squash soups.  They often need salt or lack some type of seasoning and typically they're too watery.  Why do so many chefs add apples and baking spices to butternut soup?  It's not dessert!  In my opinion, it should be more savory and less sweet.  I've ordered squash soup at restaurants before feeling confident that I'm making a smart, healthy choice, but after a few spoonfuls I feel disappointed.  Anyone else felt this way before?  In my mind, butternut squash soup might as well be called "jealousy soup," because I'm usually envious of the appetizers other people ordered.        


Many butternut squash soups disappoint, but this is an absolutely fantastic recipe.  I've made it a dozen times and for some reason, we don't tire of it quickly.  Peter and I like to have a small bowl as a first course to our meal and sometimes we pack it in our lunch bags with half a sandwich.  The flavors from roasting the squash and caramelizing the onions make it very special and give it the savory quality that I crave in a soup.  The blend of herbs--parsley, sage, rosemary, and thyme--is absolutely perfect.  Fresh herbs are essential!  If you want to cut back though, at least use fresh rosemary and thyme.  When I prepare this soup, I use homemade chicken stock, but I'm sure the canned version would be just fine as long as you get the low-sodium version to control the saltiness.  If you want to make this vegetarian friendly, substitute vegetable stock for the chicken stock.  Now, as a disclaimer: this recipe is not low-fat.  There will be heavy cream involved.  However, this soup is so rich, flavorful, and creamy, a relatively small serving is satisfying.  Expect to see empty bowls!  


Butternut Squash Soup
adapted from Tim Douglas' Seattle Kitchen

3-4 lb. butternut squash
olive oil for brushing squash
1 Tbsp. butter
2 Tbsp. olive oil
4 c. thinly sliced onions (about 2 onions)
3 c. chicken stock (or vegetable stock)
1/2-3/4 c. heavy cream
1 1/2 tsp. chopped fresh flat-leaf parsley
1/2 tsp. chopped fresh sage
1/2 tsp. chopped fresh rosemary
1/2 tsp. chopped fresh thyme
1 tsp. sherry vinegar or apple cider vinegar
kosher salt and freshly ground black pepper
creme fraiche and thyme sprigs for garnish

Preheat the oven to 400 F.  Cut the squash in half and scoop out the seeds.  Brush the cut edges with olive oil and place on a baking sheet, cut side down.  Roast the squash until very soft, about 80 minutes.  Remove from the oven.  When cool enough to handle, scoop the squash out of the skin and set aside.

While the squash is roasting, caramelize the onions.  Heat the butter with the olive oil in a sauté pan over medium heat.  Add the onions and cook slowly, stirring occasionally until they are soft and golden brown, 20-30 minutes.  Do not let them burn or become crispy.  Set aside.

In a food processor fitted with a standard chopping blade, process the squash, onions, and 1 cup of chicken stock until smooth.  This may need to be done in two batches, depending on your food processor.  Pour the puree into a large pot.  Add the remaining 2 cups of chicken stock and heat the soup to a simmer, stirring occasionally.  Add the heavy cream, chopped herbs, and vinegar.  Season to taste with salt and pepper.

To serve, ladle the hot soup into bowls and serve with a swirl of creme fraiche and a thyme sprig.  This soup can be made a few days before you plan to serve it; just store it in the refrigerator and reheat before serving.     


Saturday, December 17, 2011

S is for Sausage Cheese Grits

Today I want to share one of my all-time favorite breakfasts: sausage cheese grits.  It is absolutely perfect for brunch or a family breakfast with lots of people around the table.  Expecting company?  Do you want to try something other than French toast and breakfast casserole?  If you prepare this dish, I promise you'll win over the hearts those stubborn northerners who claim not to like corn grits!


Growing up, my mom used to present this steaming dish on Saturday mornings and we would wrap up the leftovers to enjoy all week.  It will be creamy and smooth the day that you first prepare it, but after some time in the refrigerator, it will become more like a firm cake that can be cut into squares and reheated for a minute in the microwave.  Don't expect too many leftovers though.  Everyone at your table will be asking for seconds!  


Peter likes to make this dish when we have a house full of company.  Trust me when I say it's just as popular around the holidays as it is in the heat of summertime at the lake house.  Oftentimes, we put this dish together at night before we head to bed so that we can just pop it in the oven in the morning.  It does require nearly an hour of cooking and resting time before you can serve it, so I'll admit I sometimes set an alarm to get up to put it in the oven and then I go back to bed for a while.  I usually serve this dish along with toast and a mixed fruit salad.  Enjoy!

Sausage Cheese Grits
from Judy Diehl

1 lb. pork sausage, browned and drained
4 c. water
1 tsp. salt
1 c. grits (not instant)
4 eggs, lightly beaten
1 1/2 c. (6 oz) sharp cheddar, shredded and divided
1/2 c. milk
1/4 c. butter, softened
salt and pepper to taste

Brown and drain the pork sausage.  Set aside.  In a saucepan, bring water and salt to a boil.  Slowly stir in the grits and reduce the heat.  Cook 4 minutes.  Remove from the heat and add a small amount of hot grits to eggs while stirring.  Return the grits, now mixed with eggs, to the saucepan.  Add the butter and stir until it melts.  Stir in browned sausage, 1 c. shredded cheese, and milk.  Stir until well mixed.  Pour into a greased 13x9" baking dish.  Sprinkle with the remaining cheese, salt, and pepper.  Bake at 350 F for 50-55 minutes.  Once you remove it from the oven, let it rest for about 10 minutes before serving.  

Variations:
This grits casserole is also fantastic with pepper jack cheese, spicy sausage, and a can of drained Rotel tomatoes with green chilies if you're looking for a Mexican flair to your breakfast.  

If you have swiss cheese and leftover spiral ham, substitute these ingredients for the cheddar and sausage.